



How to set up your Mac Laptop for outdoor movie event production
Your Mac laptop can serve as the media control center for your next outdoor movie event. In this post we share our favorite settings to help your event look smooth and professional.
As an example, we set up a MacBook Pro M1 (2020) running macOS Big Sur. For the media player, we recommend the free VLC Player.
Power management and display settings
First, you'll want your display to stay on during the screening and never enter sleep mode.

Turn on Do Not Disturb so notifications — a sudden update or a private email — don't distract your audience from the content on screen.

From experience, it helps to change the desktop background on your second screen (the projector). An event logo at 1920×1080 works best, or at least a solid black background.

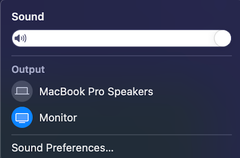
Don't forget to switch your sound output to the projector if you're sending audio over HDMI.
You can mirror or extend the image to the second screen. Extending is the recommended option, so the audience doesn't see you setting up and tuning the screening on your laptop display.

Turn off Night Shift so the projector shows the original colors without a warm tint.

Turn off True Tone to deliver the most accurate image to your projector.

Uncheck “Displays have separate Spaces” to hide the menu bar on the second screen.

VLC Player settings
By default, VLC resumes a media file from where you last stopped. That's handy at home but not at a professional screening, where you typically test files before showing them. Set “Continue playback” to “Never.”

Uncheck “Show video within the main window” so you can keep your playlist and controls on one screen while the full-screen video plays on the projector.

Check “Start in full screen” so your video opens full-screen on the projector right away, without having to move the cursor to the second display and maximize the window each time.

Uncheck “Enable OSD” so VLC doesn't display the media file's title each time it starts.

These basics will let you handle your next outdoor movie event easily and smoothly. Know other useful Mac settings? Share them in the comments below.
Great article. This is pretty much exactly how I run my shows. VLC also let’s you create playlists, so you can automate a whole program with trailers, etc.
One thing I would add is the Boom 2 app for Mac, which allows for robust EQ control and also allows you to use any iOS device to control volume remotely, so you can patrol the perimeter with your device in hand, fine tuning your levels in real time.